بِسْــــــــــــــــــمِ اللهِ الرَّحْمَنِ الرَّحِيْمِ
اَلْحَمْدُ للّٰهِ رَبِّ العَالَمِيْنَ والعاقبة للمتقين
وَالصَّلاَةُ وَالسَّلَامُ عَلىَ إمام الْمُرْسَلِيْنَ،نبيين مُحَمَّدٍ وَعَلَى اٰلِهِ وَصَحْبِهِ اَجْمَعِيْنَ
ربى اشرح لى صدرى ويسر لى امرى واحلل عقدة من لسانى يفقهو قولي
اللّهُمَّ إِنِّيْ أَعُوْذُ بِكَ مِنْ عِلْمٍ لاَ يَنْفَعُ، وَمِنْ قَلْبٍ لاَ يَخْشَعُ، وَمِنْ نَفْسٍ لاَ تَشْبَعُ، وَمِنْ دَعْوَةٍ لاَ يُسْتَجَابُ لَهَا
اَمَّا بَعْدُ
Hadith Intro - Chapter: Regarding the Divine Decree (Qadr)
الْمُؤْمِنُ الْقَوِيُّ خَيْرٌ وَأَحَبُّ إِلَى اللَّهِ مِنَ الْمُؤْمِنِ الضَّعِيفِ وَفِي كُلٍّ خَيْرٌ احْرِصْ عَلَى مَا يَنْفَعُكَ وَاسْتَعِنْ بِاللَّهِ وَلاَ تَعْجِزْ فَإِنْ أَصَابَكَ شَىْءٌ فَلاَ تَقُلْ لَوْ أَنِّي فَعَلْتُ كَذَا وَكَذَا . وَلَكِنْ قُلْ قَدَّرَ اللَّهُ وَمَا شَاءَ فَعَلَ فَإِنَّ ” لَوْ ” تَفْتَحُ عَمَلَ الشَّيْطَانِ
The strong believer is better and more beloved to Allah than the weak believer, although both are good. Strive for that which will benefit you, seek the help of Allah, and do not feel helpless. If anything befalls you, do not say, “if only I had done such and such” rather say “Qaddara Allahu wa ma sha’a fa’ala (Allah has decreed and whatever he wills, He does).” For (saying) ‘If’ opens (the door) to the deeds of Satan.
The Prohibition of “If Only” Do not say, “If only I had done such and such…”, for saying “if” opens the door to the deeds of Satan. This ruling clarifies that the word “if” must not be used to oppose destiny. When facing sickness, death, or calamity, one must submit, be patient, and seek reward from God rather than dwelling on unchangeable past events. Such regret leads only to fruitless doubt and despair. Instead, the believer should affirm: “Allah has decreed, and whatever He wills, He does” (Qaddara Allahu wa ma sha’a fa’ala).
The Nuance of Regret It is important to distinguish between prohibited and permissible uses of “if only”:
Prohibited: Using it to object to fate or dwell on negative outcomes (e.g., “If only I chose a different doctor, he wouldn’t have died”).
Permissible: Using it to express a desire for missed opportunities to do good, without questioning God’s decree (e.g., “If I had known he was sick, I would have visited him”).
Distinguishing Free Will from Compulsion Humans inherently possess the ability to distinguish between voluntary actions driven by their free will and involuntary actions caused by compulsion. For instance, intentionally walking down stairs is recognized as a personal choice, whereas accidentally falling is understood as occurring without one’s will. Similarly, involuntary bodily functions due to illness (like incontinence) are clearly distinguished from voluntary functions after recovery. Every individual instinctively recognizes this difference.
Theological Consistency Because we know this difference, it is fundamentally unjust to inconsistently shift theological stances based on convenience. One should not adopt a deterministic mindset (Jabriyyah) only when sinning—claiming it is inescapable fate—while adopting a free-will mindset (Qadariyyah) when performing good deeds—claiming full personal credit for their obedience.
اللَّهُمَّ أَرِنَا الْحَقَّ حَقًّا، وَارْزُقْنَا اتِّبَاعَهُ. ،وَأَرِنَا الْبَاطِلَ بَاطِلاً، وَارْزُقْنَا اجْتِنَابَهُ
Ultimate Network Infrastructure Guide
This guide is designed to be followed from top to bottom. It transforms a fresh Mikrotik into a powerful, segmented network firewall with ad-blocking and remote access capabilities.
1. Hardware & Safety (Anti-Lightning)
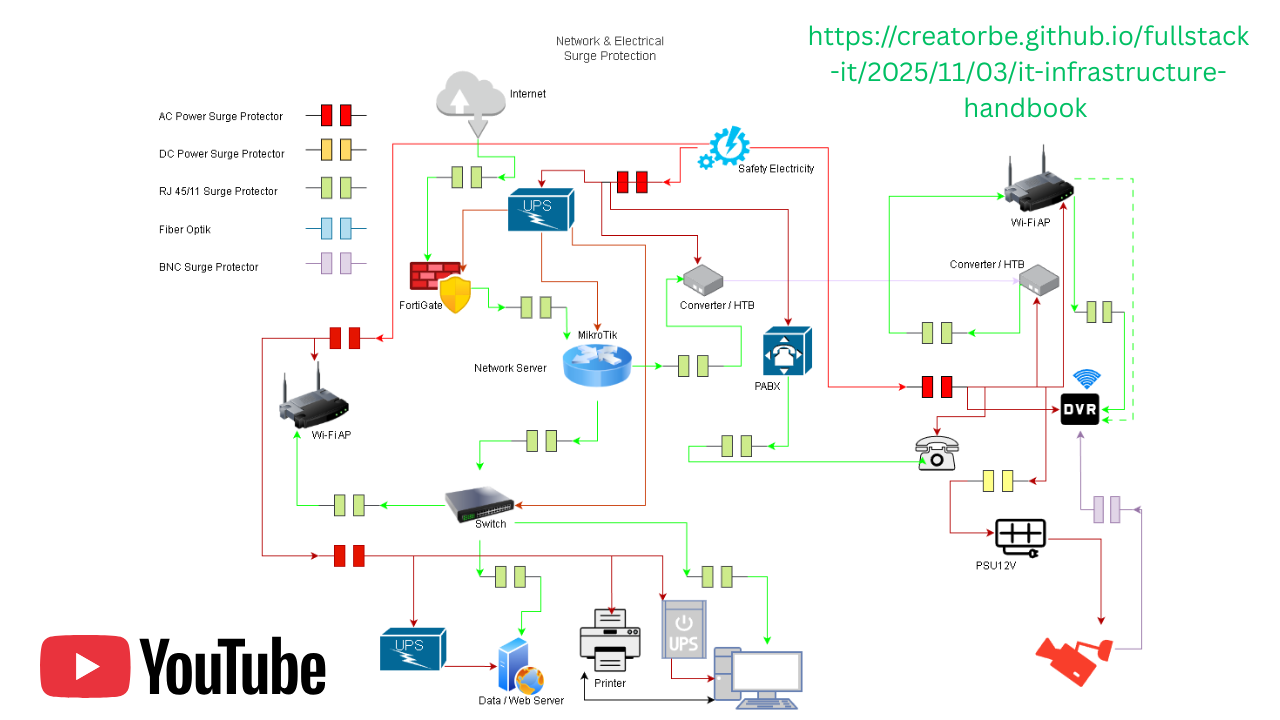
Before configuring software, we must secure the hardware. Since I live in a lightning-prone area, I use Optical Isolation and Barrel Connector to protect the router.
The Logic: Lightning surges travel through copper wires (ISP cables). They cannot travel through glass (Fiber Optic).
The Topology:
[ISP Modem (Bridge Mode)]
      | (RJ45 Cable)
[Media Converter A]
      |
      | (Fiber Optic Patch Cable - The "Safety Gap")
      |
[Media Converter B]
      | (RJ45 Cable)
[Mikrotik RB5009 (Port 1 - Internet)]
      | (RJ45 Barrel)
[Router / Access Point]
Note: If lightning strikes the ISP line, only “Media Converter A” burns. The expensive router remains safe.
I have also written a small proposal (Indonesian Version) that you can review : Network & Electrical Surge Protection
2. Mikrotik Configuration
I have prepared a complete script based on the “Ma’had Syathiby” topology. It separates traffic into groups: Ikhwan (Men), Akhwat (Women), IT, Lab, and Streaming.
How to apply:
- Download Winbox from Mikrotik.com.
- Connect your PC to Port 2 of the router.
- Open Winbox, click “Terminal” on the left menu.
- Copy and Paste the following scripts one by one.
Part A: Interface & IP Setup
Renames ports and sets up network addresses.
# 1. Reset & Preparation
/system identity set name="RB5009-Main"
/interface ethernet
set [ find default-name=ether1 ] name=ether1-Internet loop-protect=on
set [ find default-name=ether2 ] name=ether2-LAN-Ikhwan loop-protect=on
set [ find default-name=ether3 ] name=ether3-WiFi-Ikhwan loop-protect=on
set [ find default-name=ether4 ] name=ether4-LAN-Akhwat loop-protect=on
set [ find default-name=ether5 ] name=ether5-WiFi-Akhwat loop-protect=on
set [ find default-name=ether6 ] name=ether6-LAN-IT loop-protect=on
set [ find default-name=ether7 ] name=ether7-WiFi-Streaming loop-protect=on
set [ find default-name=ether8 ] name=ether8-Lab loop-protect=on

# 2. IP Addresses
/ip address
add address=192.168.10.1/24 interface=ether2-LAN-Ikhwan
add address=192.168.20.1/24 interface=ether3-WiFi-Ikhwan
add address=192.168.30.1/24 interface=ether4-LAN-Akhwat
add address=192.168.40.1/24 interface=ether5-WiFi-Akhwat
add address=192.168.50.1/24 interface=ether6-LAN-IT
add address=192.168.60.1/24 interface=ether7-WiFi-Streaming
add address=192.168.90.1/24 interface=ether8-Lab

# 3. DHCP Server Setup
/ip pool
add name=pool-ikhwan-lan ranges=192.168.10.50-192.168.10.254
add name=pool-ikhwan-wifi ranges=192.168.20.50-192.168.20.254
add name=pool-akhwat-lan ranges=192.168.30.50-192.168.30.254
add name=pool-akhwat-wifi ranges=192.168.40.50-192.168.40.254
add name=pool-it-lan ranges=192.168.50.50-192.168.50.254
add name=pool-streaming ranges=192.168.60.50-192.168.60.254
add name=pool-lab ranges=192.168.90.50-192.168.90.254

/ip dhcp-server
add address-pool=pool-ikhwan-lan interface=ether2-LAN-Ikhwan name=dhcp-ikhwan lease-time=1h
add address-pool=pool-ikhwan-wifi interface=ether3-WiFi-Ikhwan name=dhcp-ikhwan-wifi lease-time=1h
add address-pool=pool-akhwat-lan interface=ether4-LAN-Akhwat name=dhcp-akhwat lease-time=1h
add address-pool=pool-akhwat-wifi interface=ether5-WiFi-Akhwat name=dhcp-akhwat-wifi lease-time=1h
add address-pool=pool-it-lan interface=ether6-LAN-IT name=dhcp-it lease-time=1h
add address-pool=pool-streaming interface=ether7-WiFi-Streaming name=dhcp-streaming lease-time=1h
add address-pool=pool-lab interface=ether8-Lab name=dhcp-lab lease-time=1h

# 4. Network Config (Gateway & DNS)
/ip dhcp-server network
add address=192.168.10.0/24 gateway=192.168.10.1 dns-server=192.168.50.100
add address=192.168.20.0/24 gateway=192.168.20.1 dns-server=192.168.50.100
add address=192.168.30.0/24 gateway=192.168.30.1 dns-server=192.168.50.100
add address=192.168.40.0/24 gateway=192.168.40.1 dns-server=192.168.50.100
add address=192.168.50.0/24 gateway=192.168.50.1 dns-server=192.168.50.100
add address=192.168.60.0/24 gateway=192.168.60.1 dns-server=192.168.50.100
add address=192.168.90.0/24 gateway=192.168.90.1 dns-server=192.168.50.100

# 5. Enable Internet
/interface list add name=WAN
/interface list member add interface=ether1-Internet list=WAN
/ip dhcp-client add interface=ether1-Internet disabled=no
/ip firewall nat add chain=srcnat action=masquerade out-interface=ether1-Internet
Part B: Security, Firewall & AdGuard Redirection
Blocks YouTube, Social Media, and forces all DNS traffic to AdGuard.
# 1. Interface Lists for Security
/interface list add name=LAN
/interface list add name=TRUSTED
/interface list member add interface=ether2-LAN-Ikhwan list=LAN
/interface list member add interface=ether3-WiFi-Ikhwan list=LAN
/interface list member add interface=ether4-LAN-Akhwat list=LAN
/interface list member add interface=ether5-WiFi-Akhwat list=LAN
/interface list member add interface=ether6-LAN-IT list=TRUSTED
/interface list member add interface=ether7-WiFi-Streaming list=LAN
/interface list member add interface=ether8-Lab list=LAN

# 2. Block Lists
/ip firewall layer7-protocol add name=Block_YouTube regexp="^.*(youtube.com|ytimg.com|googlevideo.com).*\\\$"
/ip firewall address-list add list=sosmed comment="fb/ig/tiktok" address=31.13.95.35
/ip firewall address-list add list=sosmed address=157.240.0.0/16
/ip firewall address-list add list=sosmed address=199.96.57.0/24
/ip firewall address-list add list=sosmed address=23.48.173.0/24

# 3. DNS Redirection (Force AdGuard)
/ip firewall nat
add chain=dstnat action=dst-nat dst-port=53 protocol=udp src-address=!192.168.50.100 to-addresses=192.168.50.100 to-ports=53 comment="Redirect DNS to AdGuard"
add chain=dstnat action=dst-nat dst-port=53 protocol=tcp src-address=!192.168.50.100 to-addresses=192.168.50.100 to-ports=53

# 4. Firewall Rules
/ip firewall filter
add chain=input action=accept connection-state=established,related
add chain=input action=accept in-interface-list=LAN comment="Allow LAN"
add chain=input action=drop in-interface-list=WAN comment="Block Internet to Router"
# Blocking Rules
add chain=forward action=drop dst-address-list=sosmed in-interface=ether3-WiFi-Ikhwan comment="Block Sosmed Ikhwan"
add chain=forward action=drop dst-address-list=sosmed in-interface=ether5-WiFi-Akhwat comment="Block Sosmed Akhwat"
add chain=forward action=drop layer7-protocol=Block_YouTube in-interface=ether8-Lab comment="Block YouTube Lab"
add chain=forward action=drop protocol=udp dst-port=1194,1701,1723,4500,500 comment="Block VPNs"
Part C: Bandwidth Management (QoS)
Ensures fairness so one user doesn’t slow down the network.
/queue type
add name=pcq-download-500M kind=pcq pcq-rate=500M pcq-classifier=dst-address
add name=pcq-upload-500M kind=pcq pcq-rate=500M pcq-classifier=src-address

/queue simple
add name=Streaming-Priority target=ether7-WiFi-Streaming max-limit=500M/500M priority=1/8
add name=Lab target=ether8-Lab max-limit=1G/1G
add name=IT-Unlimited target=ether6-LAN-IT max-limit=500M/500M
add name=Ikhwan-Fair target=ether3-WiFi-Ikhwan max-limit=200M/200M queue=pcq-upload-500M/pcq-download-500M
add name=Akhwat-Fair target=ether5-WiFi-Akhwat max-limit=200M/200M queue=pcq-upload-500M/pcq-download-500M
Part D: AdGuard DNS Failover
/tool netwatch add host=192.168.50.100 interval=30s up-script=AdGuardUp down-script=AdGuardDown
or via WinBox:
- Tools → Netwatch → Add (+)
- Isi Host:
192.168.50.100 - Interval:
30s(as your needed) - Up Script:
AdGuardUp - Down Script:
AdGuardDown - OK
/system script add name=AdGuardUp source="\
/ip firewall filter enable [find where comment~\"Block DNS\"];\n\
/ip firewall nat enable [find where comment~\"Redirect DNS\"];\n\
/log info \"AdGuard UP - Firewall & NAT diaktifkan\""
/system script add name=AdGuardDown source="\
/ip firewall filter disable [find where comment~\"Block DNS\"];\n\
/ip firewall nat disable [find where comment~\"Redirect DNS\"];\n\
/log warning \"AdGuard DOWN - Firewall & NAT dimatikan\""
/ip firewall filter set [find where action=drop dst-port=53] comment="Block DNS"
/ip firewall nat set [find where action=redirect dst-port=53] comment="Redirect DNS"
Make sure script run as well :
/system script run AdGuardUp
/system script run AdGuardDown
Should print :
/log print where message~"AdGuard"
✅ When it UP, firewall dan NAT aktif.
❌ When it DOWN, firewall dan NAT nonaktif.
3. Unifi Access Point Setup (WiFi)
Since the Mikrotik handles the routing, the Unifi APs act purely as antennas.
Hardware Connection:
- Connect AP Ikhwan to Ethernet Port 3 on Mikrotik.
- Connect AP Akhwat to Ethernet Port 5 on Mikrotik.
Software Setup (The Controller):
You need to configure the APs once. You can use the Unifi App on your phone or install the Controller on a Windows PC (Laptop).
- Download: Get the “UniFi Network Server” from ui.com/download.
- Install & Run: Open the program and click “Launch a Browser to Manage the Network”.
- Adoption:
- Plug your Laptop into Port 6 (IT) of the Mikrotik.
- The Unifi software should see the APs as “Pending Adoption”.
- Click Adopt.
- WiFi Configuration:
- Go to Settings > WiFi > Create New.
- SSID Name: e.g., “Syathiby @ ikhwan”, “SyathibyNet”.
- Password: Set your secure password.
- Important: Since we physically separated the ports on Mikrotik (Port 3 and Port 5), you can just set up standard SSIDs. The AP plugged into Port 3 will automatically give out “Ikhwan” IP addresses (192.168.20.x).
But sometime UniFi devices (APs, switches) cannot be adopted when they’re on different network segments than the controller.
Solution Steps:
Step 1: Factory Reset the UniFi Device (if you forgot the ssh account)
- Physical Reset: Locate the reset button on the device
- Press and hold for 5-10 seconds until LEDs indicate reset
- Device will reboot with default settings
Step 2: SSH Access to UniFi Device
- Find Device IP: Check your DHCP server or MikroTik log or use network scanner
- SSH Connection: Use terminal/Putty to connect:
ssh ubnt@[device-ip]Default credentials:
- Username:
ubnt - Password:
ubnt
- Username:
Step 3: Manual Inform URL Configuration
Once logged in via SSH, set the controller inform URL:
- Set Controller IP/Address:
set-inform http://[controller-ip]:8080/informExample for controller at 192.168.50.100:
set-inform http://192.168.50.100:8080/inform - Verify Setting (optional):
info - Apply and Test:
set-inform http://[controller-ip]:8080/informRun this command twice to ensure persistence
Step 4: Network Configuration (If Needed)
If the device needs specific network settings:
- Set Static IP (optional):
set-inform http://[controller-ip]:8080/inform - Configure Network Mode:
set-default
Step 5: Controller-Side Adoption
- Return to UniFi Controller interface
- The device should now appear for adoption
- Click “Adopt” and wait for provisioning
Step 6: Verify and Troubleshoot
- Check Adoption Status:
mca-cli info - Common Issues & Fixes:
- Firewall Rules: Ensure port 8080/TCP and 3478/UDP are open
- L3 Adoption: Enable “Override inform host” in Controller Settings
- DNS Resolution: Ensure device can resolve controller hostname
Alternative Method: DHCP Option 43
For enterprise deployments, configure DHCP server (like MikroTik):
MikroTik Configuration:
/ip dhcp-server option
add code=43 name=unifi value=0x0104C0A83264  # Hex of controller IP (192.168.50.100)
/ip dhcp-server network
set [find address=192.168.1.0/24] dhcp-option=unifi
Permanent Solution Considerations
- Network Design: Ensure UniFi devices and controller are on same VLAN or have proper routing
- Controller Hosting: Consider cloud-hosted controller for distributed deployments
- DNS Records: Create
unifiorunifi-controllerA record in local DNS (AdGuard Home)
This SSH-based manual adoption method bypasses network segmentation issues by directly telling the device where to find the controller, effectively solving cross-subnet adoption problems.
4. AdGuard Home Installation (On Router)
We will run the AdBlocker inside the Mikrotik router (Container).
Format USB: Plug a USB stick into the MikroTik. Go to
System > Disks, select it, and click Format (Choose EXT4).Enable Container Mode: Open Terminal and type:
/system/device-mode/update container=yesYou must physically press the Mode button or unplug/replug power when asked.Install AdGuard: Copy-paste this script into Terminal:
# Network Interface for Container
/interface veth add name=veth-adguard address=192.168.50.100/24 gateway=192.168.50.1
/interface bridge port add bridge=bridge1 interface=veth-adguard

# Configure Registry
/container config set registry-url=[https://registry-1.docker.io](https://registry-1.docker.io) tmpdir=usb1/pull

# Download & Start AdGuard
/container add remote-image=adguard/adguardhome:latest interface=veth-adguard root-dir=usb1/adguard logging=yes
/container start [find tag~"adguard"]
- Setup Wizard:
- Open your browser:
http://192.168.50.100:3000 - Click “Get Started”.
- Admin Web Interface: Port 80.
- DNS Server: Port 53.
- Finish setup. Now your router will send all ads here to be blocked.
- Open your browser:
You can also manual install on PC or Raspberry Pi (the cheap one is Pi Zero 2W) by download the AdGuardHome software on github.com/AdguardTeam/AdGuardHome
Installation Steps:
- Download the AMD64 version (for me win11 64bit)
- Extract to the C: drive root directory
Open Command Prompt as Administrator and navigate to the directory:
cd c:\AdGuardHomeInstall and start the service:
AdGuardHome.exe -s install
AdGuardHome.exe -s start
Windows Firewall Configuration (Post-Update): Windows Updates frequently reset inbound firewall rules, potentially blocking external connections to AdGuard Home’s DNS port (53).
Solution: Configure Windows Defender Firewall
On the host machine (e.g., 192.168.50.100):
- Open Windows Defender Firewall with Advanced Security
- Navigate to Inbound Rules
- Verify there are existing rules Allowing incoming traffic on Port 53 for both UDP and TCP protocols
If rules are missing, create them:
- Click New Rule…
- Select Port → Next
- Choose UDP and TCP (create separate rules for each)
- Enter 53 in “Specific local ports” → Next
- Select Allow the connection → Next
- Apply to all profiles (Domain, Private, Public) → Next
- Name: “AdGuard Home DNS (Port 53)” → Finish
Important Notes:
- Ensure these rules permit traffic from your local subnet (or at minimum, from your MikroTik router’s IP)
- Confirm there are no conflicting Deny rules specifically blocking Port 53
- After major Windows updates, verify these rules remain active and readjust if necessary
For reference about backup AdGuardHome settings you can visit : github.com/syathiby/AdGuardHome-configs
5. ZeroTier Setup (Remote Access)
Access your home network from anywhere in the world. (check my youtube video above for detail installations)
- Create Account: Go to ZeroTier.com and create a Network. Copy the Network ID.
- Mikrotik Setup:
/zerotier set zt1 disabled=no
/zerotier interface add name=zerotier1 instance=zt1 network=<PASTE_YOUR_NETWORK_ID_HERE> allow-managed=yes allow-global=yes
- Authorize:
- Go back to ZeroTier website.
- Scroll to “Members”. You will see your Mikrotik router.
- Check the box “Auth”.
- Firewall Rules: (Already included in the Mikrotik Config above, specifically the “Allow ZeroTier” rules).
6. SSH Windows Setup
If you have a PC at home you want to control remotely via ZeroTier.
- On the Windows PC:
- Go to Settings > System > Optional Features.
- Click “View features” -> Search for OpenSSH Server -> Install.
- Start Service:
- Open PowerShell as Administrator.
- Run:
Start-Service sshd - Run:
Set-Service -Name sshd -StartupType 'Automatic'
- Connect Remotely:
- Install ZeroTier on your remote laptop and join the same network.
- Open CMD/Terminal:
ssh username@<Windows_ZeroTier_IP>or you can ssh the broadcasted local IP.
7. Quick Tutorial: Access Files Remotely with File Browser & Ngrok
Part A : File Browser
Download & Configure File Browser
- Download File Browser from filebrowser.org
- Extract to your preferred location (e.g.,
C:\FileBrowser\) - Open Command Prompt as Administrator
Start File Browser Service
# Navigate to File Browser directory
cd C:\FileBrowser

# Start File Browser
filebrowser.exe -a 0.0.0.0 -p 1345 -r "D:\Server File"
Parameters Explained:
-a 0.0.0.0→ Listen on all network interfaces-p 1345→ Use port 1345-r "D:\Server File"→ Root directory to share
File Browser will be accessible locally at http://localhost:1345
Part B : Configure Ngrok for Remote Access
Install & Authenticate Ngrok
- Download Ngrok from ngrok.com
- Open PowerShell as Administrator
- Add your authtoken:
ngrok config add-authtoken 32yBYGkc0aRMZUQfmV57tHHqrJc_3G9du3dGfiVaLhcRzTTtc
Authtoken saved to configuration file: C:\Users\CreatorB\AppData\Local/ngrok/ngrok.yml
Create Secure Tunnel
# Create tunnel to port 1345
ngrok http 1345
Ngrok will display a public URL (e.g., https://abc123.ngrok.io) that tunnels to your local File Browser.
Part C : Access Files Remotely
First-Time Setup (via Local Network)
- Open browser and go to
http://[local-ip]:1345(e.g.,http://192.168.50.100:1345) - Create admin username and password when prompted
- Configure additional settings as needed
Remote Access Setup
- Via Ngrok URL: Access
https://your-ngrok-url.ngrok.iofrom any device with internet - Via ZeroTier/VPN: If using ZeroTier, use your ZeroTier IP instead (more secure)
Part D : Security Recommendations
Essential Security Steps:
- Strong Password: Use a complex password in File Browser settings
- HTTPS Only: In File Browser settings, enable HTTPS or use reverse proxy
- Restrict Access:
# Allow only specific IP (optional)
filebrowser.exe config set --auth.method=proxy
Windows Firewall Rules:
Ensure port 1345 is allowed in Windows Firewall:
- Open Windows Defender Firewall
- Create Inbound Rule for port 1345 (TCP)
- Restrict to private network only
Part E : Advanced: Persistent Service Setup
Create Windows Service (Optional)
# Download NSSM (Non-Sucking Service Manager)
# Run as Administrator:
nssm install FileBrowser "C:\FileBrowser\filebrowser.exe" -a 0.0.0.0 -p 1345 -r "D:\Server File"

# Start the service
net start FileBrowser
Auto-start with Windows:
- Create a shortcut to the command in Startup folder
- Or use Task Scheduler to run on boot
Part F : Troubleshooting
Common Issues:
- “Connection Refused” → Check File Browser is running and firewall allows port 1345
- Ngrok Tunnel Fails → Verify ngrok authtoken is valid
- Cannot Login → Reset File Browser config:
filebrowser.exe users rm admin
filebrowser.exe users add admin newpassword --perm.admin
Verify Connections:
# Check if port is listening
netstat -ano | findstr "1345"

# Test local access
curl http://localhost:1345
Quick Start Script
Create a batch file start-filebrowser.bat:
@echo off
cd /d C:\FileBrowser
start filebrowser.exe -a 0.0.0.0 -p 1345 -r "D:\Server File"
timeout /t 5
cd C:\laragon\www
start ngrok http 1345
Note: For production use, consider setting up proper authentication, SSL certificates, and access controls rather than relying solely on Ngrok for security.
You can also use tightvnc with zerotier or some remote desktop Chrome Remote Desktop (with password), attended mode for Rustdesk (free your own server), Anydesk, TeamViewer, etc.
8. ZKTeco Fingerprint Device Reset Method
Time-Based Password Calculation
For ZKTeco fingerprint devices that use time-based reset passwords, follow this formula:
- Get Current Time in 24-hour format (HHMM)
- Example: Current time is 14:30 →
1430
- Example: Current time is 14:30 →
- Calculate Reset Password:
9999 - (Current Time HHMM) = N
N × N = Password
Step-by-Step Reset Procedure
- On the Fingerprint Device:
- Access the device’s menu or settings
- When prompted for a password, enter:
8888 - You’ll be asked for a “super password” or “reset password”
- Calculate the Password:
- Let’s say current time is 14:30 (2:30 PM)
- Calculation:
9999 - 1430 = 8569 8569 × 8569 = 73,427,761 - Password: 73427761 (use last 8 digits if longer)
- Enter the Password:
- Type the calculated 8-digit password
- Device should grant access to reset/configuration menu
Important Notes
⚠️ Critical Considerations:
- Time Synchronization: Device time must be accurate for this to work
- Quick Calculation: Do the math quickly; if time changes, recalculate
- 8-Digit Limit: Use only the last 8 digits if result exceeds 8 digits
- Model Variations: Some ZKTeco models use different methods:
- Try
9999or0000as default passwords - Some use:
9999 - HHMMSS(including seconds) - Others:
HHMM × HHMMthen subtract from 9999
- Try
Summary
Now you will have a network that is safe from lightning, separated by user groups, blocks ads automatically, and can be managed from anywhere in the world.
I will periodically update this handbook with beneficial stuff inshaAllah, If you have another tips or corrections, feel free to commit your change and create PR on Our GitHub Page.
اَللّٰهُ أَعْلَم
al-faqiir ilaa rahmatillahi ta’ala
✍︎ Hasan B
◉ Ma’had Tahfizh Al-Qur’an Al-Imam Asy-Syathiby, Bogor, Cileungsi.
◴ Itsnayn, 12 Jumadil Awal 1447 H